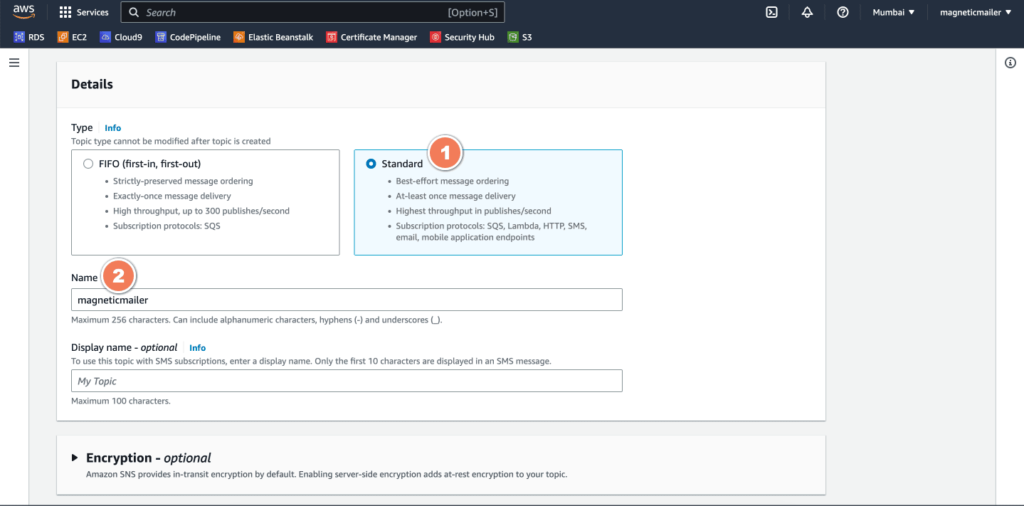
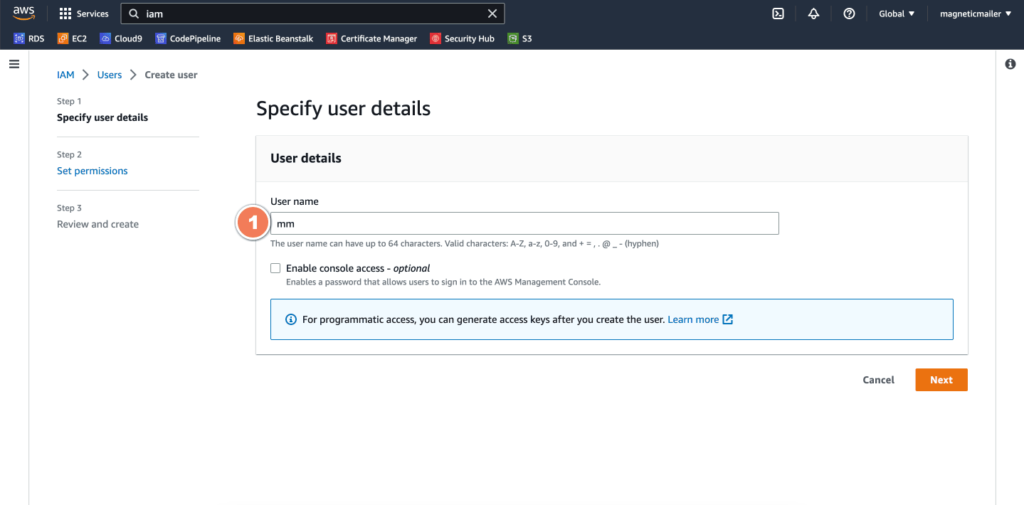
Setup & Configuration

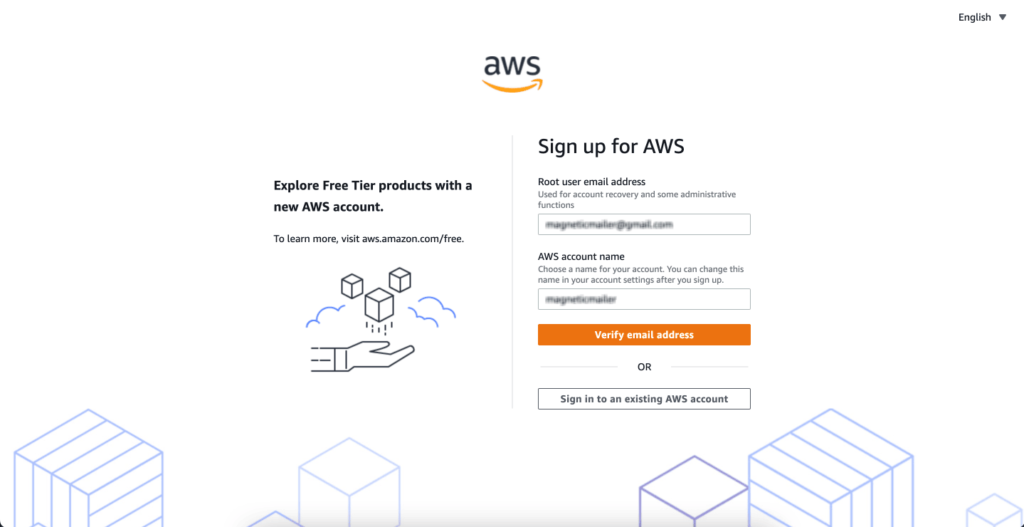
This is very simple, quick & easy documentation for setting up your AWS(Amazon Web Services) SES(Simple Email Service) account and configuring the settings under MagneticMailer Panel to unlock the unlimited email sending opportunity.

Step 1: Setup your AWS Account

You can skip this step if you already have an active AWS account.

  • Go to the AWS website or Click here to visit the link
  • Enter a valid email id and unique username. You will receive an OTP in your email for verification
  • Setup the password and basic company details like address, etc.,
  • Enter your credit or debit card details. AWS will ask for these details for validation purposes only. They will charge based on the usage at the end of the month if you have exhausted the FREE CREDIT.
  • Once the setup is done, sign in to your AWS console with the username and password in order to setup your Simple Email Service (SES)

Step 2: Amazon Simple Email Service(SES) Setup

You can skip this step if you already have an active SES setup.

  • Search for SES on the search bar and click on Amazon Simple Email Service from the search result.
  • Make sure the select the availability zone/ region near your business location for high performance. E.g. If you are in India, then select Asia Pacific(Mumbai) instead of Selecting any other availability zone/ region

Step 2a: Identity Verification

You can skip this step if you already have an active SES setup.

  • From the SES Dashboard, click on verified identities to create a new identity.
  • You can either validate an email id or domain name. If you verify an email id, then you can use only that mail id for sending mail. If you verify a domain name, then you can send emails using any id that belongs to that domain name.
Note: DO NOT USE EMAIL IDS LIKE ..@GMAIL.COM OR ..@HOTMAIL.COM. Use only professional email ids that belong to your domain name.

Step 2b: Production Access

You can skip this step if you already have an active SES setup.

  • Apply for production access only after your IDENTITY (domain or email id) is verified else your production request will be rejected.
  • In the request mail type, you can select marketing, enter a valid & active website URL and a proper & detailed use case description along with how will you manage the bounces, unsubscribers, etc.,
  • You can mention that you will be using the campaign management software to manage your bounces & unsubscribers along with all other data.
  • It will take 24 to 48 hours for the production access approval and if they have clarifications, they will ask for additional details before proceeding with production access approval.

Once production access is approved, you can send upto 50,000 emails per day

Step 3: Simple Notification Service(SNS) Setup

  • Search for SNS on the search bar and click on Simple Notification Service
  • Click on “Topics” on the left menu bar
  • Click on “Create Topic” to add a new topic

Step 3a: Topic Setup for SNS

  • In the details section, click on “Standard” and provide some name for the topic and click on create a topic.

Step 3b: Subscription Setup for Topic

  • On the next page, click on “Create Subscription”

Step 3c: Subscription Setup for Topic

  • On the next page, Select the Protocol as “HTTPS”.
  • In the endpoint, enter the below URL https://app.magneticmailer.com/amazonses/email_status
  • Click on “Enable raw message delivery” and then Create Subscription.

Step 3d: Confirm Subscription

  • Click on “Subscriptions” on the left menu or search for SNS on the search bar and you will find the subscriptions menu on the left panel.
  • Select the subscription that you have created now and click on “Request Confirmation”
  • The status will change from “Pending Confirmation” to “Confirmed”

Step 3e: Setup Configuration sets

  • Search for SES in the search bar and click on Amazon Simple Email Service
  • Click on “Configuration Sets” on the left side menu
  • Click on Create Set and enter a unique name on the next page and click on “Create Set”. Do not make any other changes to this page.

Step 3f: Define Event Destination 1

  • Navigate to Event Destination
  • Click on “Add Destination”

Step 3f: Define Event Destination 1

  • On the next page, click on “Select All” and then Uncheck “Sends”
  • Click on “Next”

Step 3g: Define Event Destination 1

  • Click on Amazon SNS on the next page and Enter any reference name for this destination
  • Under the SNS topic dropdown, select the SNS topic which we created before this step.
  • Click on next and create this event destination

Step 3h: Define Event Destination 2

  • Click on Add destination again in order to add another event destination.
  • Select the event type similar to the last time. Uncheck “Sends” and select all others

Step 3i: Define Event Destination 2

  • Select “Amazon CloudWatch” on the next step and define the reference “destination name”
  • Select “the event type similar to the last time. Uncheck “Sends” and select all others”Message Tag” under Amazon CloudWatch Dimensions.
  • Define a custom dimension name and value.
  • Click on “Next” and add this destination as well.

This notification service will capture the delivery status and will show it under reports

Step 4: IAM User Creation

  • Search for IAM in the search bar and click on users to add a new user

Step 4a: Define Username

  • Enter the username in this step. It can be any reference name
  • DO NOT CLICK On Enable console access. Simply click on Next.

Step 4b: Create UserGroup

  • Make sure to select “Add Users to Group” and then click on “Create Group”
  • In the modal popup, enter any group name, and under policies select “AmazonSESFullAccess” and “AmazonSNSFullAccess” & click on create User Group.
  • IMPORTANT: Click on the checkbox before the usergroup that you have created and click Next
  • Click on Create User in the next step and the user will be created.

Step 4c: Create & Download AccessKeys

  • Click on the username which you have created and navigate to “security credentials” tab
  • Scroll down a bit and click on “Create Access Key”. Click on “Third-party service” on the next tab and click on next to create an access key.
  • IMPORTANT: You can download the key in .csv format or copy and store it in a safe location. You need to save the “Access key” and “Secret access key”
  • These details are required to configure the AWS SES Account with your MagneticMailer account

That’s it. AWS SES Account Setup is done.

Step 5: Configure the Settings in MagneticMailer

  • Navigate to the Settings Tab in MagneticMailer Panel.
  • Enter the Access Key and the Access Secret Key that was downloaded from the IAM Console.
  • Enter the AWS availability zone/ region. You can find this in the top right corner of the AWS Panel. If it is Mumbai, then you need to enter “ap-south-1” Refer below screenshot.
  • Enter the SES Configuration Set Name. You can find this under Amazon SES Panel. Refer to the below screenshot.
  • Enter the “From” Email id. This should be a verified email or should be a part of the verified domain name.
  • You can enter any “from the name” and click on submit.
  • Test the settings by entering your email id in the below testing panel on the settings page.